How to Convert a Knitting Pattern to Crochet: A Complete Guide!
As you gain more experience crocheting, there will come a time when you find the perfect project to make only to find that the instructions are for knitting, not for crochet.
If you’re committed to crochet, there are some tips and tricks to convert a knitting pattern to a crochet pattern.
Knowing these strategies can increase your success and decrease the frustration of having to re-work a pattern over and over before you get a good result.
What are the best strategies to convert a knitting pattern to crochet?
To convert a pattern, it’s best to read the pattern completely, convert the stitches to crochet, convert the sizing to crochet, check the project gauge and then practice.
Below you’ll find a complete guide to each of these steps and some tips on what types of projects are the easiest to convert.
Before You Begin
Before you begin the step-by-step instructions to convert a knitting pattern to crochet, it’s important to note that pattern conversion requires intermediate or advanced experience with both knitting and crochet.
At a minimum you should be comfortable reading and following the abbreviations in most knitting and crochet patterns before you begin the converting process.
The fact is, knitting patterns can’t always be directly translated to crochet.
Sometimes you need to ‘guess’ or make a judgement call about how the project will look the best in crochet.
In those cases, it’s helpful to have experience with some free-design in crochet (creating a project or two without a pattern).
If this your first time converting a knitting pattern, remember that practice and trial-and-error learning is a big component.
Step One: Read the Pattern
It may sound obvious, but the first step in converting a knitting pattern to crochet is to read the entire pattern.
There is no possible way to convert a pattern if you do not understand what each of the steps in the pattern mean.
Make sure you can visualize each instruction in the knitting pattern first before you begin the conversion.
If you’re unsure about a particular step or an abbreviation in the knitting pattern, you may need to create a sample using knitting first.
This can give you an idea about what the project should look like and your end goal in crochet.
Online resources and photos of the finished project created using knitting can also help you visualize.
Step Two: Decide on Crochet Stitches
Once you read the knitting pattern, the next step is to decide the type of crochet stitch you’ll use to re-create the knitted fabric.
Depending on the type of knitting required by the pattern, there are several different types of crochet stitches that will look similar to knitting.
Here are four common crochet stitches that can be used to create ‘knit-like’ fabrics:
The Waistcoat Stitch — If your knitting pattern calls for stockinette stitch, one option is to use the waistcoat stitch.
Also known as the center-post stitch, it works up into a tight and even stitch similar to a knitted stockinette stitch.
It’s a variation on single-crochet, made by inserting your hook into the center of the post (just under the inverted “v”) and then completing the stitch like single crochet.
Waistcoat stitch should be started with Row 1: Chain of any length followed by Row 2 of single crochet.
It’s common to see waistcoat stitch used ‘in the round’ and with more dense yarns.
It creates a very sturdy, dense fabric, so it may not a good choice for soft, delicate garments.
The Back Loop Only Method — Another common technique to create the ribs in a knitted-looking fabric is to use the back loop only method.
A more advanced stitch, back loop crochet involves exactly what it describes, rather than crochet into both loops of a stitch, back loop crochet only works in the back loop of each stitch.
Back loop crochet can be done with single crochet, double crochet, and some more advanced crochet stitches.
In all of these options, it will create a fabric with a ‘ribbed’ appearance like garter stitch or finely ribbed knitting stitches.
Note that when certain yarns are crocheted using the back loop crochet stitch, the effect can be quite stretchy.
When working with fitted garments or projects with complex measurements, it’s important to create a gauge swatch first.
Shepherd’s Knitting / Slip stitch crochet — A third method called shepherd’s knitting or slip stitch crochet is a specialty technique invented in Scandinavia and the Middle East long before traditional crochet came about.
Just as the name suggests, it involves creating rows worked entirely in slip stitch.
To work slip stitch crochet, simply slip stitch into the front loop of each stitch in the previous row.
It can be worked both flat and in circular and looks similar to garter stitch in knitting.
It will create a semi-flexible fabric with a delicate texture. It’s a good multi-purpose stitch.
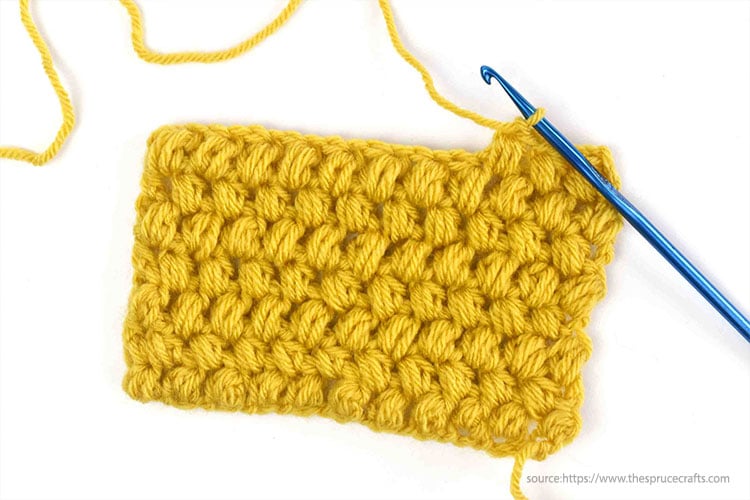
Bonus Stitch – Linen/Moss Stitch — A final stitch worth adding to your toolkit for converting knitting patterns to crochet is the moss stitch.
This is a method to re-create a linen stitch in knitting using the moss stitch in crochet.
The two stitches are nearly identical in appearance, but crafted in different methods.
Moss stitch results in a dense, multi-purpose fabric with a unique ‘woven’ appearance.
In knitting, the linen stitch is created using an even number of stitches and alternating rows of knit and purl stitches in this pattern:
Row 1: knit 1, *slip 1 with yarn in front, knit 1; repeat from * to end.
Row 2: purl 1, *slip 1 with yarn in back, purl 1; repeat from * to end.
In crochet, the moss stitch is worked in a similar two row pattern, with single crochet and chain stitches.
To create the basic moss stitch pattern, repeat this two row combination:
Row 1: [Ch 1, sk next st, sc into next st] across.
Row 2: [Ch 1, sc into ch sp, ch 1, sk next sc] across
Step Three: Check the Gauge
Once you’ve determined the type of crochet stitch you plan to use to convert your knitting pattern with, it’s time to make a gauge swatch with the new stitch.
While it’s good to always check your gauge before creating a new project, it’s especially important when converting patterns.
Why create a gauge swatch?
A gauge swatch will help you determine the total number of stitches you need to create to make a specific length and width of finished crocheted fabric.
Typically made in a 5” by 5” square, a gauge swatch is an important tool to decide how many stitches are necessary to convert from knitting to crochet (see Step 4).
Converting a Knitting Gauge Swatch to Crochet
The knitting pattern you’ve selected to convert to crochet should include a suggested gauge swatch and knitting needle size.
In some cases, it may be helpful to knit a gauge swatch first to confirm that your yarn tension and yarn weight create the same gauge as listed in the pattern.
Otherwise to convert the knitting gauge swatch to crochet, select the same yarn you’ll use for your final project and review the gauge measurements in the knitting pattern.
Convert the suggested needle size to an estimation of the hook size you should start with (e.g. a US size 3 knitting needle converts to a D or 0 crochet hook).
Check online for a conversion chart or purchase a crochet hook sizing ruler if you’re unsure.
Some yarn labels will also suggest a specific crochet hook size suitable for that weight of yarn as a way to convert knitting to crochet.
Then review the measurements of the knitting gauge swatch and attempt to create a crochet gauge swatch of the same size.
How to Create a Crochet Gauge Swatch
The basic process of creating a crochet gauge swatch is as follows:
Create a chain equal to that distance and then begin crocheting in the stitch you selected in Step 2 until you complete the final measurements.
For each count the total number of stitches to complete a row of that length.
Then keep track of the total number of rows to complete that width of fabric.
For example, if the knitting pattern has a gauge measurement of 5” x 5”, you’ll chain enough stitches to create a 5” row.
Working with the crochet stitch you selected to convert the knitting pattern, complete enough rows to make a 5” square.
Complete the swatch, then place it on a flat surface. Count the total number of rows and the total number of stitches and then average that to determine how many stitches are required for each inch of crochet.
You can also create gauge swatches in centimeters, just convert to determine how many crochet stitches are required per centimeter.
If you complete your gauge swatch and the fabric sample doesn’t have the exact appearance you desire, you may need to make adjustments.
Increasing or decreasing the size of the crochet hook can dramatically change the appearance of a finished fabric swatch.
If your gauge swatch is too loose, switch stitches or try a smaller hook size.
If your gauge is too tight, adjust the stitch tension or switch to a larger crochet hook.
You may need to adjust the type of yarn for the project to get the appearance you desire.
Step Four: Decide on Measurements
After you create your gauge swatch and have determined the total number of stitches for each inch, it’s time to start converting the measurements of the knitting pattern to the crochet pattern.
Determine the final product size.
The first step is to create a visual diagram of the finished project that includes the total measurements of the finished knitting project.
For example, let’s say you are converting a pattern for a knit receiving blanket from knitting to crochet.
The finished dimensions in the knitting pattern are 35” by 30”.
Create a visual diagram with the finished measurements recommended in the knitting pattern (e.g. square drawn with the length 35” and width 30” marked.
For more complex projects like garments, bags, or accessories, you will need to sketch out the dimensions of each piece that needs to be crocheted.
Convert the width to crochet.
Once you have the final measurements of your project identified, the next step is to determine how many crochet stitches it will take to create the same width.
Using your gauge swatch and the total number of stitches per inch, multiply the total number of inches in the project by the total number of stitches per inch measurement.
Using the receiving blanket example, if your gauge is 5 stitches per inch, in order to get a width of 30”, you’ll need to multiple 30 inches by 5 stitches. (e.g. 30 X 5 = 150 stitches).
The estimate for how many chains to start with (and how many single crochets you need per row) is 150.
Convert the length to crochet.
Similar to converting the width, the next step is to convert the total length of the project to determine how many rows are necessary to complete the length of the project.
Using your gauge swatch and the total number of rows needed per inch, multiply the total number of inches in the project by the total number of rows per inch.
Going back to the receiving blanket example, if the gauge swatch suggests you need 2 rows per inch, multiple 35 inches of total project length by 2 rows per inch (e.g. 35 x 2 = 70 rows).
Record measurements and create written instructions.
Using your gauge swatch conversions, the next step is to record your measurements and create some written notes next to your visual diagram.
In this case, it would be important to write the length of the initial chain, the number of crochet stitches in each row, and an estimate of the total number of rows.
Note that these measurements are your best ‘guestimate’ for how the project will convert from knitting to crochet.
The final step is to create a practice sample and start making tweaks to your converted pattern.
Step Five: Create a Practice Sample
Once you have written pattern instructions, the next step is to start crocheting.
Follow your notes and instructions, double-checking your work at each step in the project.
As you create this practice sample, use this type of logical thinking process to get the best result:
- Create your initial chain. Does the chain seem to match the size you’d like the finished piece to be? If yes, continue with the first row. Is it too large? Try removing a few chains or double checking that your gauge is still the same. Is it too small? Change your tension or add a few chains.
- Create a few rows of the pattern. Is the fabric starting to look like a finished knitted fabric? Does your gauge still follow the gauge sample? If yes, make a note that your pattern fits and continue on. If not, what is distorted about the project? Is it too small? Too large? Rip back to the initial chain and start again. Adjust your measurements in the notes and begin again, tweaking to get a slightly different result.
- Repeat for each piece of the pattern. For accessories, garments, and projects with multiple pieces repeat the same process for every part of the knitting pattern. You may need to practice each step independently before you’re able to assemble the entire project together.
A Final Note About Persistence
The reason Step 5 is listed as a “practice” sample, is that it may take you several different attempts to convert a knitting pattern to crochet.
The process essentially involves designing a new project from scratch so you may need to create a few different ‘models’ before you decide on the perfect product.
The important thing is to be persistent and not give up before you create the perfect converted crochet pattern.
Even the most experienced crochet artists run into mistakes, have to rip back to correct them and begin again. The biggest mistake in crochet is to give up on a project.
Leaving a project behind because you’ve made an error is the worst way to experience the relaxation and fun of crocheting.
Take a break for a few minutes and then come back to the project.
Whatever you do, don’t create a large pile of unfinished projects in your yarn stash. Those ‘unwanted’ misfits might just be your favorite projects if you just keep going!
Other Tips for Converting Patterns
Plan to use more yarn.
While there is debate among crocheters about if knitting or crochet requires more yarn, it’s generally accepted that certain types of crochet stitches—including the ones listed above—require more yarn than knitting uses.
Some say that crochet takes up to one third more yarn, but that depends on the gauge.
If you’ve carefully created your gauge sample (using a similar gauge and stitch height as the knitting pattern), it’s still best to plan to have more yarn.
Note though, that if you substitute a different weight of yarn or use a more complex stitch or sizing than in the knitting pattern, the exact ratio may not hold true.
There’s not a simple math calculation to convert, only to use the sample gauge swatches.
Create one sample gauge swatch in each knitting and crochet stitches, then unravel and compare how much yarn it took you to knit the swatch vs. crochet the swatch.
That will give you an idea of if and how much more yarn you’ll need to crochet than knit. It is always best to err on the side of having too much yarn than not enough!
Some knitting patterns are easier to convert to crochet than others.
As disappointing as it may be, the simple fact is not all knitting patterns are created equal.
Some knitting patterns, especially those with specialty colorwork techniques like fair isle and intarsia, or specialty garment shaping don’t convert well into crochet.
The more complicated the knitting pattern, the more complicated the crochet pattern will be.
It’s not that it’s impossible, it’s just not always practical.
If you’re just getting started converting patterns to crochet, remember there’s no formula to the perfect conversion.
You’re looking for a similar result but may not get an identical result.
Keep good notes.
Just like anything craft with some trial-and-error, it’s a good idea to keep careful notes when you are converting a pattern.
As noted above, there’s no magic formula, just a general method to follow to re-design the knitting pattern.
Since you’re creating a new design, keeping detailed notes about the crochet hooks, gauge, and measurements is important as you test what works and what doesn’t.
Keeping good project notes can also be helpful down the road.
If you need to set aside a project and come back to it, it will be easier to jump back into the project than needing to recall the conversion measurements or re-do the entire pattern conversion.
Similarly, you may decide to re-create another project using the same converted pattern.
Family members may love your finished product and want one of their own!
Members of your crochet group may decide they’d like to try the same technique.
Saving your notes on the exact stitches and measurements you used to convert the pattern from knitting to crochet, it is much easier to re-create a second or third project.
Keep practicing until you get it right.
As noted above, the goal for converting a knitting pattern to crochet is not to create an identical product, but to get as close as possible.
It’s not always possible to re-create a knitting pattern exactly the same in crochet.
But by practicing a variety of different stitches and adjusting measurements and gauge, you can often get very close results.
With careful practice, sometimes the end outcome is even better than the knitting pattern.
Related Questions
Can you convert a crochet pattern to knitting?
Unfortunately, while converting knitting to crochet can be easily done with some practice, it’s much more difficult to convert crochet patterns to knitting.
Crochet involves so many different types of stitches whereas knitting is limited to different combinations of knit and purl stitches. Some crochet patterns can be converted to knitting (especially those with simple stitches and straight, rectangular edges).
Complex crochet patterns like lace, Tunisian crochet, or amigurumi projects are much more challenging to convert to knitting.
Again, not impossible but likely not practical.
In some cases, those experienced at knitting and crochet find it easier to just learn the opposite technique rather than regularly trying to convert knitting patterns into crochet.
Can you crochet with a knitting needle?
It’s not that it cannot be done, but without the element of a hook, it’s difficult to create a crochet stitch with a knitting needle.
Each stitch must be manually held to the knitting needle and pulled one by one onto the chain.
This leads to poor stitch quality and is incredibly slow.
The finger motions are also awkward and over time could lead to some very sore hands.
While a knitting needle might not be the best solution if you find yourself without a crochet hook, there are some simple options to either use finger crochet or make a DIY crochet hook from household materials.
Finger crochet is a method to create crochet stitches using only your finger as the hook.
It’s typically worked with soft, bulky yarns and patterns with simple crochet stitches.
If finger crochet does not seem to fit your project and you are committed to using a hook, there are some make-shift solutions that might carry you through until you can find the right crochet hook for your project.
Using a pencil, chopsticks, or a toothbrush, carve out the hook shape on the opposite end of the handle to create a make-shift crochet hook.
Just be sure to check the project gauge before you begin to determine the size of your homemade crochet hook.
Can you combine knitting and crochet in the same project?
Another method to convert knitting and crochet patterns is to combine the two together in the same project.
Known as knooking, “pronounced nook-ing”, the technique uses a special crochet hook with a hole at the opposite end of the hook.
A cord is looped through this hole on which the stitches hang, just like in knitting.
There are many products you can buy to learn knooking and practice with the special hook.
It’s important to note though, that knooking stitches are not the same as basic crochet or knitting stitches.
You’ll need to learn brand new stitches either way, so it’s not a short cut to learning knitting or crochet.
Some custom patterns are available for the knooking technique, but it’s not as popular or widely published as knitting or crochet.
Ultimately you’ll likely need to learn to convert either crochet or knitting patterns to knooking anyway. It might not be the shortcut you are searching for.
would like to change knit 1, slip 1, knit 1, pass slipstich over knit, knit 2 together ,to crochet. I have my mothers slipper pattern but it is knit.
thank you