The first time you read a crochet pattern, it can feel like a foreign language. Once you’ve mastered the basic stitches, the next step is to move into reading patterns and learning the common crochet terms. Understanding how to read crochet patterns and diagrams can break open the options for new projects to make.
How do you read crochet patterns? The easiest way to learn to read a crochet pattern is to learn the common abbreviations and terms. Then practice translating the abbreviations into the pattern directions row by row. Even more experienced crocheters will need to look up a reference chart like the one listed below. Learn the basics and then refer to your chart for the less common abbreviations.
The Basic Crochet Pattern Terms
Crochet patterns contain abbreviations for the stitches (e.g. single crochet, double crochet, popcorn) and abbreviations for common steps or procedures (e.g. increase, decrease, repeat stitches). Once you have learned the basic stitches, it will be important to commit these abbreviations to memory:
Abbreviations for Basic Stitches

sc – Single crochet – Single crochet is the most basic crochet stitch. To complete a single crochet stitch, draw up a chain from the previous row (2 on the hook). Bring the yarn over the hook from back to front and draw it through the loops on the crochet hook.
Example: Row 2: With size M hook, 2 sc in first sc, sc in each remaining sc. Read this as “Using a size M hook, work 2 single crochet stitches in the first single crochet of Row 1, then work a single crochet in each remaining single crochet of Row 1.”
sl st – Slip stitch – A slip stitch is less of a ‘stitch’ and more of a procedure to join stitches or to move to another part of a row without creating a stitch. To work a slip stitch, draw yarn through the top two loops of your next stitch, yarn over and draw through all the loops on your hook.
Example: Rnd 3: Sl st into each of next 2 sc. Read this as: “In the third round, slip stitch into each of the next two single crochet stitches.”
ch – Chain – The chain is typically how crochet patterns begin. Create your slip knot, then draw hooked yarn through the loop of the slip knot. This is one chain stitch. Repeat the number of chain stitches required by the pattern to form your foundation chain or what the rest of your project will build from. You may also see “chs” in a pattern, the plural abbreviation for chain stitch.
Example: Starting with Size O and white, ch 4. Join with sl st to form ring. Read this as: “Begin the project with a size O crochet hook and white yarn. Chain 4. Join with a slip stitch to form a ring”. This project is likely then to be crocheted in the round.
dc – Double crochet – Double crochet is another common basic crochet stitch. To complete a double crochet stitch, yarn over and bring two stitches onto the hook (three loops total on the hook). Bring the yarn through the first two loops on the hook (two loops total on the hook). Yarn over again and draw through the remaining two loops on the hook.
Example: Row 4: 1 sc in each of the next 13 sc, 2 dc in the next 2 sc, 1 sc in each sc to end. Read this as: “Beginning in row 4, work a single crochet into each of the first 13 single crochets of row 3. Then work 2 double crochet stitches into the next two single crochet stitches. Then work a single crochet stitch into each of the remaining single crochet stitches in the row.
hdc – Half double crochet – Half double crochet describes a stitch that is half as tall as a double crochet. It eliminates part of the double crochet to form a slightly smaller stitch. To complete the half double crochet, bring up three stitches as you would for a double crochet, yarn over and bring through all three loops in one motion. This is the half double crochet (1 loop remains on the hook).
Example: Rnd 2: 1 hdc over ch-1 space. Rnd 3: 1 hdc between each hdc of previous rnd. Read this as: In round one, create a half double chain stitch in each of the chain spaces of round 1. Then in round three, work a half double chain stitch between each of the half double chains created in round 2. This pattern is describing a decreasing shape (as if for the top of a hat).
tr / trc – Treble crochet – Treble crochet, also known as the “triple” stitch is a basic crochet stitch that is slightly taller than a double crochet stitch. To make a treble crochet stitch, yarn over twice, inserting the hook into the 5th chain from the hook. There are now four stitches on the hook. Yarn over and draw through 2 of the loops. Three loops remain. Yarn over again and draw through 2 loops. Two loops remain. Yarn over and draw through the final 2 loops. 1 loop remains.
Example: Row 1: Skip 3 ch, tr into next chain and each ch across, turn. Read this as “In row 1, skip the first three chains, then treble crochet into the fourth chain. Then work a treble crochet stitch into each remaining chain in the row. Then turn the project to begin the next row.
tch – t-ch – Turning chain – At the beginning/end of each row you must complete a turning chain in order to establish the correct height of the next row. The abbreviation for a turning chain will often be seen at the beginning of a crochet pattern to indicate the length of a turning chain, or when the length of the turning chain changes for a design element in the pattern.
Abbreviations for Basic Crochet Steps
Inc – Increase – The abbreviation inc in a crochet pattern means increase/increases/increasing. In general, that means the row will have additional stitches in it than the previous row. Typically the pattern will tell you exactly where to increase the stitches and the method to add the additional stitch. If the pattern does not indicate how to increase, simply work two stitches in one stitch.
Example: Rnd 4: Work 1 rnd in sc. Rnd 5: Inc in every 3rd sc. Read this as “ In round 4, work the entire round in single crochet. In round 5, increase the row by creating two single crochet stitch in every third single crochet stitch from round 4.
Dec – Decrease – In contrast, dec indicates decrease/decreases/decreasing in a crochet pattern. The current row will have fewer stitches than the previous row. There is a different method to decrease for single, double, half double and treble crochet stitches. Your pattern should indicate which method to use.
Example: Rnd 10: 1 sc in each sc, dec 3 sts evenly spaced around the toe. Read this as “In round 10, work a single crochet in each single crochet from the previous round, however, decrease a single crochet in three stitches evenly spaced in the round.” This project is for a slipper or bootie.
Rep – Repeat – A common abbreviation in basic crochet patterns, repeat indicates that you should complete the same step or steps as previously completed. It can include repeating a series of stitches or can include repeating a row.
Example: Row 2: 1 sc in each sc, do not join. Row 3: Rep rnd 2 This can be read as “In row 2, work one single crochet into each crochet of row 1. Do not join the rounds together. For row 3, complete the same step as row 2, working a single crochet stitch into each stitch.
ch sp – Chain space – Any time you encounter a hole or space in between stitches, this is called a “chain space.” It’s created when you chain between stitches to create a gap. Occasionally, a pattern will tell you to crochet into the chain space, abbreviated by “ch sp.”
Example: Rnd 2: 1 hdc, ch-3 sp. Rep to end. This can be read as “In round 2, work one half double crochet stitch, then create a chain of 3 chain stitches before working another half double crochet. Repeat this set of stitches to the end of the round.
YO – Yarn over – Another common abbreviation in knitting and crochet projects is yarn over. This describes moving the yarn over the crochet hook to form a loop without drawing it up from the project. The pattern may also indicate yo btf, meaning yarn over by moving the yarn from back to front of the hook or yo ftb, meaning yarn over by moving the yarn from front to the back of the hook.
Parentheses, Brackets, and Asterisks

Crochet patterns may also use parentheses, brackets, braces, and asterisks to direct you to repeat a block of rows or a block of stitches. In each case, the special marker is there to provide additional information or clarifying steps. In all cases, make sure you ‘interpret’ and clearly understand an entire crochet pattern before you begin the project.
( ) – Parentheses – Parentheses are used to provide clarifying information or to group a set of stitches together. Occasionally, you will also find the total number of stitches in a row in parentheses at the end of the row instructions.
Example: Row 1: Ch 3, turn work across row, working 3 dc in each chain (44 dc). In this pattern, the parentheses indicate there should be 44 double chains remaining when the row is completed.
[ ] or { } – Brackets – Brackets indicate that you should repeat the instructions within the brackets as directed. The stitches are indicated in the bracket and the number of times to be repeated is located outside of the bracket.
Example: Row 1: [1 sc, 1 hdc, 7 dc] 7 times This should be interpreted as “In row one, work one single crochet, one half double crochet, and seven double crochet. When you’ve finished those stitches, complete the same set six more times until you reach the end of the row.”
- – Asterisks – Similar to brackets, patterns may use an * to indicate you should repeat a set of stitches. There may be one asterisk which indicates you should complete everything prior, or there may be an asterisk placed before and after the stitches to be used.
Example: Row 1: 1 sc into 2nd ch from hook, * skip 2 chs, 5 dc into next ch * to end of row. Read this pattern code as “In row one, begin by working a single crochet into the second chain from the hook. Skip 2 chains and then work 5 double crochet stitches into the next chain. Repeat everything between the asterisks until you reach the end of the row.
Other Abbreviations and Terms

While in many cases a crochet pattern will highlight specific abbreviations or less-common terms at the top of the pattern, these are some others you may encounter:
2tog – 2 Stitches Together – This abbreviation is always found paired with a type of crochet stitch (e.g. sc2tog, dc2tog, or tr2tog). It indicates that you should decrease the number of stitches in the row by stitching two stitches together. For example, if the pattern reads dc2tog, that means double crochet 2 stitches together, combining 2 stitches into 1.
beg – Begin/Beginning – Indicates what you should do at the beginning of a row or the beginning of a project. May also be used to indicate continuing until the ‘beginning’ of a round or where the two rounds are joined together for projects crocheted in the round.
bpsc / bpdc / bptr – Back Post Crochet Stitch (single, double, treble crochet stitch) – Back post crochet stitches create unique projects and are a way to ‘turn’ and begin working crochet stitches at a 90-degree angle from the current row. Back post stitches can be worked in single, double and treble crochet stitches, which means there are three different abbreviations that indicate a back post stitch and the type of crochet stitch to use.
cont – Continue – This abbreviation indicates you should continue with the current stitch you are working until the pattern tells you to stop. Patterns tend to direct you to continue to the end of a row or to continue for a specific number of rows.
fpsc / fpdc / fptr – Front Post Crochet Stitch (single, double, treble crochet stitch) – Similar to back post crochet, front post crochet stitches are also a unique stitch to turn and create stitches at a 90-degree angle from the stitches in the current row. Front post stitches can also be worked in single, double and treble crochet.
MC / CC – Main color and Contrasting Color – These two abbreviations appear in patterns that use more than one color of yarn. Main color refers to the color that will dominate the final project or in many cases, the color yarn you will use the most of. CC refers to ‘contrasting color’ or where in the pattern you should switch to using a contrasting color of yarn. If multiple colors of yarn are to be used in the pattern, you may see the CC abbreviation paired with a number (e.g. MC= grey, CC1 = yellow, CC2 = blue).
RS / WS — Right Side / Wrong Side – While more common in knitting projects, right side and wrong side abbreviations refer to the front and back of a project. The right side is generally recognized as the front of the project (e.g. RS of a sweater would be the side that faces away from the body). The wrong side is generally recognized as the back of the project or the side that will not be visible (e.g. WS of amigurumi project is the ‘inside’ of the object to be stuffed).
Measurement Abbreviations
Not only are their abbreviations for the stitches and procedures in crochet, but there are also abbreviations for the common measurements used. Millimeter (mm), centimeter (cm), or meter (m) can be used to measure the size of projects or the size of a crochet hook, as can inches ( “ or in.) Yarn is often measured in grams (g), ounces (oz), or yards (yd).
International Abbreviations
As if there aren’t already enough complexities to interpreting crochet patterns, it’s important to note that the abbreviations above are the standard crochet abbreviations for American crochet patterns. Patterns that are developed in the UK, Canada, or Japan may have different terms and subsequently different abbreviations. For example, in U.S. patterns, yarn over is abbreviated (yo). In the UK and Canada, it’s referred to as ‘yarn over hook’ and therefore abbreviated (yoh). If you’re unsure of a crochet term in your pattern, check the front or back of the pattern book for a key or do an online search of “what does ___ symbol mean in crochet?”
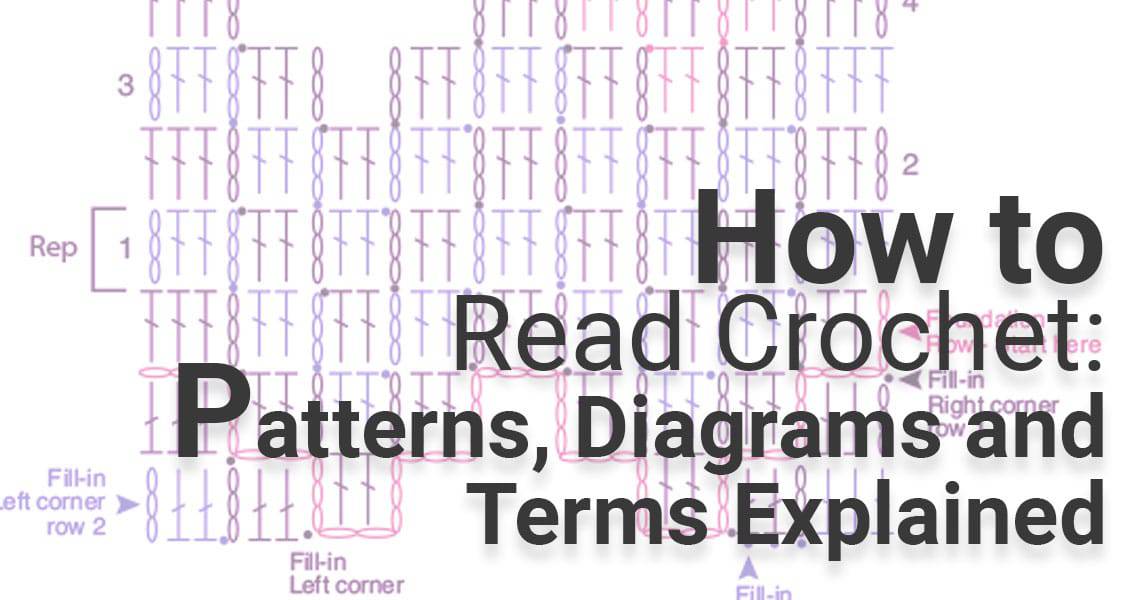
Crochet Diagrams

Not all crochet patterns will use row-by-row text directions. Some crochet patterns use crochet diagrams to communicate the instructions and the design of the project. These charts use a symbol to represent each stitch in the project. They can also be used side-by-side with text directions to give added clarity to a project’s instructions.
Why should you learn to read a crochet diagram?
While most beginners start with text patterns, there are some good reasons to know how to reach crochet diagrams.
- First, some crocheters are visual learners and constantly having to ‘translate’ abbreviations into the actual instructions for each row can be frustrating. Some people find the visual instructions of a crochet diagram easier to understand than the written ones.
- Crochet diagrams are great for projects that have instructions written in a foreign language. you don’t have to know the written language in order to read the crochet diagram and complete the project.
- The visual instructions can also be useful to supplement the text instructions because it shows the final completed project. It can give you a good sense of the proportions of a project or where certain steps like yarn color changes or turns should be completed.
- Finally, understanding how to read a crochet diagram can expand the number of patterns and complexity of projects you can make.
Parts Of A Crochet Diagram
The first thing to do when reading a crochet diagram is to locate the diagram’s ‘key.’ Just like a map key indicates what the symbols on a map represent, the key on a crochet pattern will tell you how to interpret the diagram.
Just like there are some standard abbreviations, there are standardized symbols used in crochet diagrams (single crochet, double crochet, treble crochet, etc.) However, each crochet stitch used in the pattern should be listed in the key.
Once you have identified each stitch in the key and where it’s located in the visual diagram, identify the place to start. Crochet diagrams are still either crocheted row by row or in the round. For projects row by row, the image should tell you where to start and then generally they are worked bottom to top. For projects in the round, the diagrams are generally worked from the inside out and worked counter-clockwise.
Note: Crochet diagrams are generally manufactured for right-handed crocheters. If you are left-handed, you may need to modify the crochet diagram (working it clockwise or from a different starting point). You may also find it more useful to use the written instructions.
Getting Started with Crochet Diagrams
If you are just learning to read a crochet diagram, it’s best to learn with a pattern that also has text instructions. That way you can cross-check any part of the diagram that’s not clear with the written instructions before proceeding.
Other tips to follow: It can be helpful to mark your place in the crochet diagram when you set a project aside. That way you can easily find your place again in the pattern when you return. Don’t forget to check your gauge before beginning diagrams. Even though there’s a visual, it’s important to make sure you’re starting your project with the right hook and the right tension.
Related Questions
What is the difference between beginner, easy, intermediate and advanced crochet patterns?
Crochet patterns are generally divided by four different categories of difficulty, beginner, easy, intermediate and advanced/complex. Beginner patterns use only basic stitches (single crochet, double crochet) and may have some increasing and decreasing rows. Beginner patterns are great for all levels of crocheters.
Easy patterns are the next level of difficulty. They will also use only basic stitches but could include simple stitch patterns. Easy patterns might also incorporate simple changes in yarn color or some shaping. Beginners should feel comfortable with all of the basic stitches before moving into easy patterns.
Intermediate patterns are great for crocheters that have made multiple beginner or easy projects and are ready for a new challenge. These projects include more involved stitch patterns, colorwork and shaping projects. You should be able to put stitches together in a variety of combinations and be able to complete multiple sets of repeating rows and stitches at the same time.
Advanced patterns are for the most experienced crocheters. These patterns require competency in all stitches and may require some basic design techniques as well. Advanced patterns may also require the construction of pieces, sizing garments, or complex yarn color changes.
Are crochet pattern terms the same as knitting pattern terms?
If you place a crochet pattern and a knitting pattern side-by-side, many of the abbreviations would be the same. Knitting and crochet patterns share abbreviations for the procedures that are done in both knitting and crochet. Some examples include (sl st) slip stitch, (inc) increase, (dec) decrease, (alt) alternate, (yo) yarn over, (MC/CC) main color/contrasting color.
However, because knitting and crochet use different stitches, many abbreviations will appear in one type of pattern but not the other. The common crochet stitches (sc, dc, tc) abbreviations will not appear in a knitting pattern. Likewise, the common knitting stitches (k for knit, p for purl) would not occur in a crochet pattern.
Does the turning chain count as a stitch in crochet patterns?
After each crocheted row, it’s necessary to create a ‘turning chain’ before turning the project and beginning to crochet the next row. Different crochet stitches require you to insert a different length turning chain to make sure the next row is the appropriate height. For example, single crochet requires one turning chain. Half double crochet requires two. The turning chain continues to get larger with double and treble crochet stitches.
The tricky question comes if the turning stitch counts as the first stitch in the row. Most patterns will indicate if the turning chain counts as a stitch. However, it is generally accepted in crochet practice that the turning chain does not count as a stitch. Simply create the turning chain and work the rest of the row as written in the pattern.