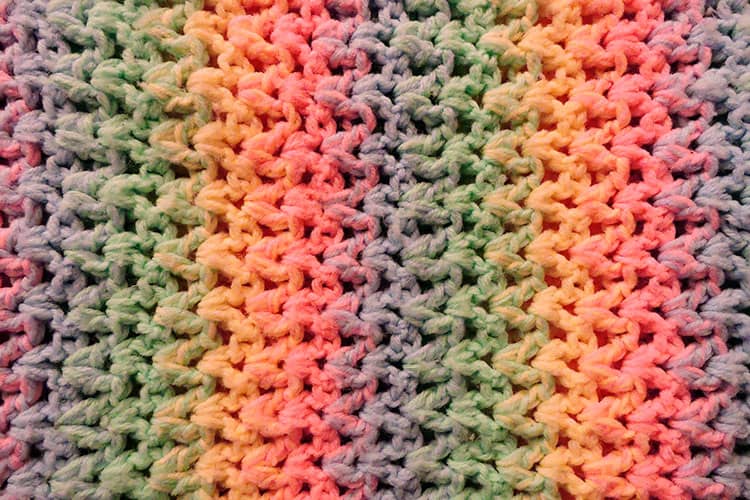
We all want our finished crochet projects to look as professional as possible. That is one reason learning to crochet rows evenly is important for beginning crocheters. Crocheting in uniform, straight rows create the smooth and polished look we all want from our projects.
How do you learn to crochet rows evenly? The step-by-step guide below outlines a method to crochet rows to create even edges. The technique involves consistently turning the chain of stitches the same way throughout your project to create nice, even rows. In addition, below you will find some tricks and tips regarding yarn tension and creating foundation rows that can help your rows be as uniform as possible.
Straight Edge Method

The method below is outlined in single crochet however can be applied with any stitch and any yarn. It is suited for all projects that require straight, uniform rows and even edges. Some examples to try this on: gauge swatches, scarves, pillows, afghans and blankets, dishcloths.
Step 1: Create Your Foundation Chain
The technique to crochet even rows can be done on any length of project. Start with a slip knot and create your foundation chain as the pattern outlines.
Step 2: Start the First Crochet Row
When you have completed your foundation chain, work a single crochet in the second stitch from the hook (as you would in any traditional crochet pattern requiring single crochet). Continue with single crochet across the rest of the row.
Step 3: Start the Second Crochet Row (Turning)
The technique to create even, smooth edges to crochet rows begins in this step. When you reach the end of the row, chain one in turn (as usually recommended in a pattern). Turn the project and begin to work across by stitching in the very first stitch, right next to the chain. When working a single crochet stitch, most traditional crocheters will instruct you to work in the second stitch. The straight edge technique recommended here moves away from that to work in the very first stitch.
After you create a single crochet in the first stitch after the chain, continue with single crochet across the row. You will now have a perfectly even edge on the right side of your project.
Step 4: Ending the Second Crochet Row
When you reach the end of the second row, you will again deviate from traditional single stitch method. Simply work a single crochet into the last stitch. Do not work it into the turning chain from the previous row, just into the last single crochet. You will know you’re working in the stitch because it forms a “v” shape with the yarn whereas the turning chain is just a loop.
After you work into the last stitch, chain one and turn. Begin the next row by returning to Step 3. This creates the perfectly even edge on the left side of the project.
Step 5: Repeat
For each of the remaining rows, repeat Step 3 and 4, crocheting in the very first stitch of the row and working into the last stitch in the row, not the turning chain.
As mentioned above, this method of crocheting in the first and last stitch in every row rather than the second stitch and turning chain will create even, professional-looking edges for every row of your project.
Straight Edge Method With Other Stitches
The method above can be used with all types of stitches and all types of yarns. In all crochet projects, it is important to note that the number of chains you use to start a new row in your turning chain will change depending on the type of stitch you choose. The length of the turning chain depends on the height of the stitch you are using.
As outlined above, shorter stitches like single crochet require one turning stitch. Half double crochet also uses one turning stitch. Chain 2 to start a double crochet row. Chain 3 to start a treble crochet row, etc. You may also decide to adjust the turning chain length if you are using a specialty yarn or a different hook size than your pattern recommends.
Once you have mastered these steps, there are some other tips and tricks that can also help your crochet have an even and uniform size every time.
Other Techniques to Keeps Rows Even

Always turn your work clockwise or counterclockwise
Each time you come to the end of a row and turn your work to begin your next row, it is important to turn your work the same direction every time. While you are always working to get the yarn in the back of the project, accidentally turning your work the opposite direction will create a twist in your turning chain. Depending on the height of your stitch or the type of yarn you use, this can create a gap or a zig-zag shape on the edges of your project.
Carefully Count Stitches
Another common reason that crochet rows come out uneven or in a zig-zag pattern is because of stitch count. It is important to make sure that each row of your pattern has the correct number of stitches. If you add extras or accidentally miss a stitch in your row, it will be a different size than the previous row. Different size rows will create uneven edges in your rectangular projects. Try using stitch markers or stitch counters if you frequently find yourself with the wrong number of stitches in a row.
Increasing/Decreasing Evenly Across A Row

Sometimes a crochet pattern will require increasing or decreasing the total number of stitches in a row. However, doing so without the proper technique can create uneven or unprofessional looking rows. Adding too many stitches together in a row can create bulk in the fabric. Decreasing too many stitches together in a row can create a spot where the fabric binds.
Often crochet patterns will designate where in your row to add or subtract stitches to avoid fabric bulking or binding. Other times a pattern will give a general note, like “increase 3 stitches evenly across the row” but not specifically designate where to add the stitches. You may also need to determine the best place to increase or decrease if you are designing your own pattern. To do so, there is a simple math calculation to keep the rows as even as possible.
To increase: Count the total number of stitches in your row and divide by the number of stitches to be added in the row. If you have 90 stitches in your chain and you’re told to increase the row by 5 stitches, divide 90 by 5 to identify where you should increase the stitches. 90 ÷ 5 = 18. Increase every 18 stitches to divide it out evenly across the row.
To decrease: The same formulas apply. If you have 42 stitches in a row and you need to decrease by 4 stitches, divide 42 by 4 to determine where you should place your decreases. 42 ÷ 4 = 10.5. In this example, you should decrease somewhere between 10 and 11 stitches to evenly distribute the 4 stitches across the row.
Do not let a little math discourage you. The end goal is to distribute the stitches evenly across the row to avoid extra bumps and bulges in the fabric as much as possible.
A Note About Tension
Another reason a beginner’s crochet rows end up is uneven could be the yarn tension. If yarn tension is variable across the rows of a project, some stitches will appear tight and other stitches will be looser.
Having uniform, consistent yarn tension is something that develops with the more practice you have crocheting. If you constantly find yourself fighting to work the stitches in your next row because it is too difficult to insert the hook in the stitch, you are likely working your stitches too tightly. Loosen up your grip on the hook and the yarn. Relax and try to keep stitches tight enough to be secure and uniform but not too tight to be unable to work them in the next row.
If it is difficult to keep consistent tension on a project you may be using the wrong hook size for the type of yarn you have selected for your project. Try practicing a gauge swatch with a few other hook sizes and see if the tension improves with a different hook.
A Note About Foundation Rows
Another reason rows in crochet projects may end up uneven is because the foundation chain (where you started the project) was created too tightly. If the tension on this first row is tighter then the tension in the other rows, the project will appear to widen as your tension begins to loosen in subsequent rows. The rows will appear uneven and your project will literally begin to ‘bend.’
When you begin new projects, always keep in mind that uniform tension (not too tight, not too loose) is best for the foundation row. Some crocheters recommend using a hook that is one or two sizes larger than the recommended hook size to create the foundation chain. Creating the first row or two with the larger hook before decreasing back to the recommended hook is a good way to ensure that the foundation row will match your other rows evenly.
How to Crochet Evenly When Working In The Round

The methods outlined above all consider projects that are worked in even, straight rows. But what happens when you crochet in the round? In some cases, it can be even more challenging to create even, professional-looking rows when crocheting in the round. The key here is to know when to increase stitches in each row and to carefully keep track of the total number of stitches in each round.
Failing to increase the correct number of stitches per round or increasing at the incorrect point in the round will result in lop-sided or uneven stitches in each row. Stitch markers are the easiest way to keep track of these points in your project. Use a stitch marker to calculate the start and end of each row and markers to indicate where you should increase to keep the rows increasing evenly. Taking care to increase at a different point in the row will make sure that the project lays flat as well.
Related Questions

How to crochet rows without turning?
One common question that comes up in crochet is if it is ever possible to crochet straight row projects (like pillows, scarves, and blankets) without turning the project. This is slightly different than working in the round where rows continue to spiral together.
The correct answer is yes, it’s possible to crochet without turning a project and it’s done by holding the hook in your non-dominant hand. If you typically hold a crochet hook in your right hand, you create the left-stitched as you normally would, but then move the hook to your left hand to create the right-stitched rows.
This technique can often be found in specialty laces or amigurumi where it’s necessary to have each row ‘forward-facing’ instead of having a front and rear side of the stitches. It certainly takes some practice to catch on to this type of “backhanded” crochet, but it can be very helpful for certain projects. It can also be a fun new technique to learn for more experienced crocheters.
How do you fix a curving crochet project?
Occasionally the rows of a crochet project will be even, but the edges of the project will begin to curl up. For blankets and any rectangular project that has started to curve there are a few easy options to address the curve.
The first process is blocking, where you wet the finished project and then stretching the project tightly into the desired shape. Once stretched, the project is pinned down and then allowed to dry completely. Depending on the type of yarn and the amount of stretching required, when the project is dry the previously curved edges dry straight.
Another common reason projects may curve and be uneven is the tension of the foundation row. As noted above, if the tension on your foundation row is tighter than the other rows, the project will appear to widen as your tension begins to loosen in subsequent rows. Visually you can see this happen if your project forms a rainbow shape where the first rows are very tight and the tension slowly begins to loosen. Adding a border may address some foundation row issues, however, the best choice may be to start the project over and begin with a larger hook.
One final option to fix the curving project is to keep crocheting the curve into a design element. If your project is curved because of irregularities in the lengths of your crochet rows, it may be possible to replicate the curve in a mindful way for the rest of the blanket. Rather than an error, the curving becomes a design element adding interest to your project.
How do you put a border on an uneven crochet blanket?
While the method above should mean it’s not necessary to create a border on a crochet project, there are several easy ways to add a decorative border or need to clean up the edges of an old project. If your crocheted blanket is one solid color, use that same yarn to create the border. If your crochet blanket has a color changing pattern, select the color that will be the least conspicuous. Borders are meant to hide errors, not draw attention to them!
If using the same color yarn, do not fasten off. Just continue with a single crochet row first, and work up the side of the stitch instead of in the top or bottom of the stitch. Make sure that you place the stitches consistently as you work around the blanket as possible (to avoid holes or missed stitches).
When you arrive at a corner, patterns will typically tell you how many stitches to work in the corner. Depending on the pattern you may need to add 2-3 stitches in each corner to get a nice even tension around the corner. If the stitches are “pulling” the tension is too tight and you need to add 1 or 2 more. If the stitches are ‘sagging’ in the corners, you’ve added too many and need to reduce them.
After adding the single crochet row, it’s then possible to add additional decorative rows to create the border. Options include a crab stitch or a repeating shell stitch. Remember that a slip stitch is usually used to connect the start and end of your starter row and then stitches are worked ‘in the round’ for the rest of the border. Use a stick marker to carefully mark where your two rows are joined together.